With Jupiter and Saturn blazing in the night sky just after opposition, Mars nearing its closest approach in October and my 80 mm f/6 TMB refractor on a new iOptron CEM25EC, I decided I might as well get back into planetary photography! When I last did this two decades ago, most people used modified webcams (with the lens removed and the sensor placed at the focus of a telescope). Today, a huge selection of dedicated and affordable astro cameras is available from many manufacturers.
For my relatively short focal length, I wanted small pixels to achieve high resolution. I also didn’t want the hassle of dealing with filters, preferring a color camera. (In case you don’t know, all CCD/CMOS sensors are black and white – the “color” ones just have an integrated filter array called a “Bayer matrix” consisting of two green, one blue and one red filter over four adjacent pixels that are combined to one “color” pixel.)
![]()
From the 14 models of Omegon Pro astro cameras available, customer service at Astroshop recommended the veLOX 178 C as the best fit for my needs. After a month of intensive testing, I produced a Youtube video showing the unboxing of the camera and steps necessary to get results using a MacBook. This article is more or less the text version of that video, so if you prefer reading instead of watching and listening, stay with me!

On the side of the box, you’ll find the model identifier and the production date, in my case May 25th 2020. This camera supports both the ASCOM and the INDI protocols. The latter gives it the rather unique advantage of being Mac-compatible. It runs natively on PHD (Windows and Mac) and the N.I.N.A. suite (Windows only). Next to a list of what’s inside, the third side of the box shows all the variants of the Omegon Pro cameras.

On the inside, a fitted insert protects the gear: the ST-4 cable for using the camera as an autoguider, a USB cable with gold-plated plugs to connect the camera to a computer, a set of extension and adapter rings with 1.25″ thread, and of course the camera itself. It’s very compact, just 71 mm long and 41 mm in diameter, weighing in at 90 grams. The bronze anodized aluminum has a premium touch. On the back, you’ll find the ports for the guiding and USB cables. On the front, a protective cover hiding the 6.4 megapixel color sensor with 3096 x 2080 pixels at a pitch of 2.4 microns.
![]()
The reason I go specifically into use on macOS is that nearly no documentation exists for astrophotography with Apple products, as almost all astrophotography gear runs exclusively on Windows. To use the camera on a Mac, the friendly folks at AstroShop recommended I take a closer look at KStars. It’s a free, open source, cross-platform astronomy software that not only provides an accurate graphical simulation of the night sky from any location on Earth, but also contains a plethora of amazing tools for observing and photographing the sky. One of these is the Ekos suite, a complete astrophotography solution that can control all INDI devices including telescopes, CCDs, DSLRs, focusers, filters and more.

Many Macs exclusively offer USB-C ports, so we’ll need an adapter to USB-A (the most common and recognized USB plug). With the camera cable in the adapter, the small USB-C plug goes into the laptop, and the USB-B end into the camera. Take off the dust cover just before inserting the camera into the 1.25″ eyepiece tube.

With the hardware ready, it’s time to configure the software. Launch KStars and the Ekos viewer. Create a profile for your gear by clicking on the “plus” icon. Assign a name, leave the “auto connect” checkmark and make sure the mode is set to “local”, as the camera is connected directly to the computer. Ekos requires a mount and camera in every profile, so if you’re just looking to control a camera, select “telescope simulator” from the drop-down menu under “others”. Don’t worry if you can’t find the Omegon camera in the list of CCDs: Choose the ToupCam driver, then save your profile.

It’s best to take your equipment for a daylight test drive. Without the difficulty of centering and focusing a faint target in the dark, you can get used to the hard- and software with sufficient light before moving on to the challenges presented by night photography. Set up the telescope to point at a terrestrial object that you will use to get comfortable with the workflow you’ll need after night falls.

Open the Ekos suite in KStars, then click the “play” icon to start it. A few new tabs will appear and a new window opens: the INDI control panel. Next to a tab for the telescope simulator, you will find one for the camera. In the Ekos window, clicking on the camera icon will show you a bunch of capture settings. The INDI control panel has a whole lot more, not all of which are adjustable. From my current experience, it’s not really intuitive and often unclear whether I should be changing the settings in INDI or in Ekos.


On my first try at imaging Jupiter, I had a strong green cast because I couldn’t find out how to adjust the white balance. On my 12″ screen, the sliders were simply out of sight! It might help to resize the window while you make adjustments, but this can be a bit tricky once you’ve also got the live view window open.
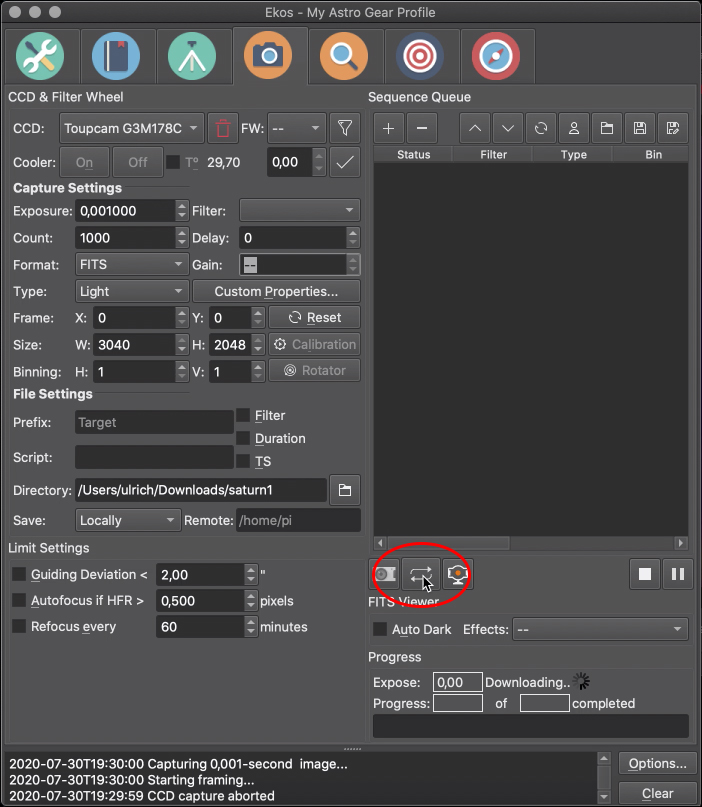
Start looping images with this icon. When you make adjustments like exposure and gain, you may need to stop and restart the looping for them to take effect. Now you can focus your image. Notice this is a lot of fiddly work, so make sure you’re confident you can do this in the dark. You might need a combination of adapters and/or extension tubes to reach focus. Make a note of what you used and how far extended the focuser tube was to get into the ballpark when doing this with fainter targets at night.
Lunar and planetary photography is easiest with a stable and well-aligned motorized mount. With my iOptron CEM25EC, polar aligned in less than five minutes using the integrated polar scope and the “PS align” iPhone app, targets stay dead-center longer than I need to focus and take all the subframes I want.
So far, I’ve figured out two ways to record data that I can use to make a final image of the Moon or a planet.
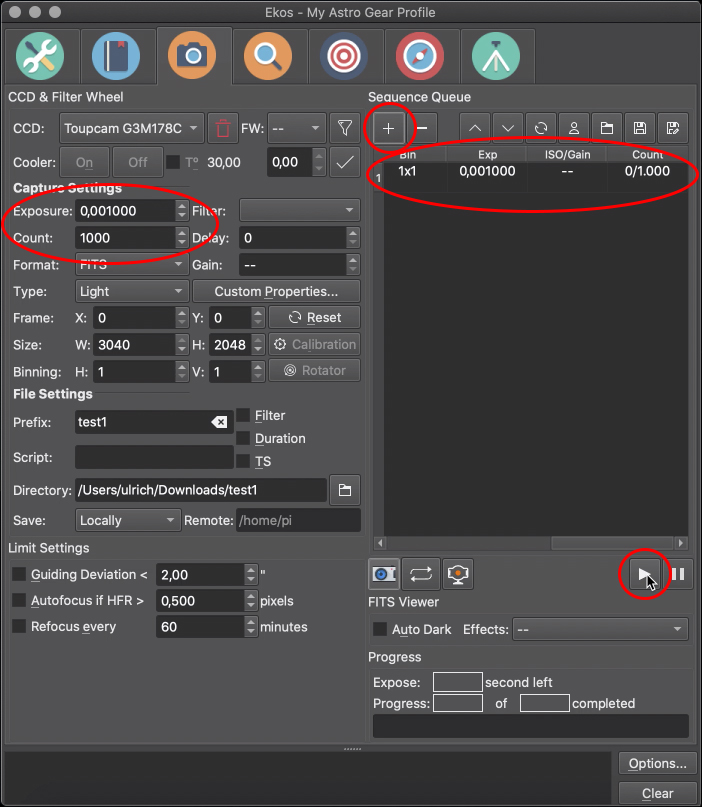
The first is telling the software to take a series of individual FITS files. When you’ve determined the correct exposure and gain by playing around with the numbers, make sure your target is focused and enter the number of frames you want in the field next to “count”. Add the task to the sequence queue with the “plus” icon. When you’re ready to go, press the “play” icon and let the software work.

When you’re imaging a planet, most times it will take up just a small part of the field of view. You can select only a part of the full frame to increase the readout speed and capture more frames per unit of time. Use the looping function in the KStars FITS viewer and activate crosshairs and pixel guidelines to help you (it’s an iterative process, don’t be frustrated if it takes a few tries to get it right!).

My preferred method of image capture is to record a video in the SER format. To do this, open the live video window via the camera icon with the red dot. In this new window, the middle icon opens a dialog that lets you choose how much material to record: a set number of frames, as many frames as possible for a set time or until the user interrupts the process. Enter your preference (I want to capture as many frames as possible in 120 seconds) and click the record icon to let the software do the work.
No matter which recording method you choose, you’ll need to process your raw frames into something you can show your friends and the internet. From the hundreds or thousands of frames, we use “lucky imaging” to align and stack only those with good seeing. Again, software makes it possible – analyzing, sorting and processing our images in mere seconds. My program of choice on the Mac is the free “Autostakkert“. Written only for Windows, it runs very stably on Mac using the Windows runtime environment “Wine“.
When recording single FITS files, I still have several problems. First, Ekos shows a sufficiently bright preview when using significantly shorter exposure times, but the images are too dark in Autostakkert. Second, I cannot get a color image from FITS. Despite all setting being identical, the result is always grayscale. Third, I can get a much higher number of frames per unit of time with video. This is relevant for high-resolution imaging of the planets, where rotation can be seen after just minutes! For these reasons, I currently only record SER files.

I’ll show you the Autostakkert workflow for these. After opening the file, use the settings as shown – for a planet, we let the program align the frames with the “center of gravity” function. Click “Analyze” and you’ll soon see a graph showing the quality distribution of the frames. There will be a few excellent frames from those fleeting moments of near-perfect seeing, a lot of average and a few really bad ones. Depending on the number of frames, we select percentage to stack. With only 800 frames in my example video, I use 25%. With thousands of frames, you can use a smaller selection. Leave the other settings as shown. In the video window, tell the program what to align on by selecting “manual draw” for a planet, then framing it as shown. Now hit “Stack”! Depending on your video’s frame size, the number of frames and your processing speed, all of these functions might take a few seconds to a few minutes.
I don’t let Autostakkert do any sharpening. All of my post processing is performed in Photoshop. I won’t claim to be good at planetary imaging and I’m sure the following steps can be improved dramatically with knowledge and experience. Remember, the purpose of this demonstration is to show what can be achieved in the first night with an affordable planetary camera and a small telescope using a Mac.
First, I resize the image to 400%, then apply selective sharpening. Be careful not to overdo it or what you think are details will really be image artifacts. Next, I apply a series of color and contrast corrections and finally reduce the size of the image to 50%. Look at the cloud structures that are revealed by sharpening and try doing this with a single frame. The main point of stacking is to increase the signal to noise ratio dramatically, allowing you to perform strong image sharpening. I’m pretty happy with my first results!

My special thanks go to Astroshop for providing the camera for this test. It was conducted without payment and contains only my personal opinion and experience. If you’re looking for high quality astro gear at a competitive price, check out astroshop.eu.
